Tag: tips

WordPress for Birding Blogs, Part 7: Authors and Access Levels

This is the part of a multi-part series about using WordPress for birding blogs. Click here to start at the beginning.

Multiple Authors

WordPress is nice in that it allows you to have multiple content contributors, each with their own level of access. Do you want to ask some friends to contribute a monthly post to your blog? Make them a Contributor and they can log in and create posts for you but can’t actually publish those posts. Want to have a blog with someone who isn’t tech-savvy but want them to have access to create and publish all the content they want but not have access to the website settings? Make them an Editor.

Here is a Summary of the Default Roles

  • Administrator – nothing is off limits, can change the theme, add users, or even delete the whole site
  • Editor – has access to all posts, pages, comments, categories, tags, and links.
  • Author – can write, upload photos to, edit, and publish their own posts.
  • Contributor – has no publishing or uploading capability, but can write and edit their own posts until they are published
  • Follower (public sites) / Viewer (private sites only) – can read and comment on posts and pages

Custom Roles

Want users to only have access to edit certain pages? Want something other than what’s listed above? Well, you have to have a WordPress.ORG install and not a .COM. This is one of those times that it pays to have your own self-hosted site. Just download one of the many custom user roles plugins available. Make sure to do your research and that the plugin is kept up-to-date.

Adding Users

Add New WordPress UsersIt’s super easy to add new users to your blog. Just locate the Users tab in the main WordPress Dashboard and select “Invite New.” You’ll be redirected to the New Users screen. From here you will be able to add new users and select their starting role from a dropdown menu.

Adding New Users to Your WordPress blog

Each new user will be sent an email with all the login information that they need. They will be able to login into your site and will only see the sections of the Dashboard menu that they have access to.

You will be able to edit a user’s access at any time. You will also be able to reset their password if they forget it.

Note: Make sure you don’t give out Administrator access to anyone. If someone has Admin access they can delete your blog, edit any content, change your settings, or even delete your user. Only give Admin access to those you really trust.

User Profiles

Each of your users can create their own profile with a description of themselves and links to their own websites and social media accounts. Depending on your theme, this profile can pop-up when you hover over the person’s name, the info can be used to auto-generate an Authors page, appear at the bottom of an author’s post, or the profile can rotate in a widget. A user’s profile is really powerful, but is solely dependent on how your theme chooses to display it.

Having additional content creators on your site can lead to interesting and diverse content. With WordPress you can make managing your staff a breeze.

WordPress for Birding Blogs, Part 6: Making it Pretty with Themes and Widgets

This is the part of a multi-part series about using WordPress for birding blogs. Click here to start at the beginning.

Themes

Think of themes as the clothes that your site wears. The basic content of the site is the same, but the way it’s displayed is different. The theme tells you what colors, fonts, and the layout of the site. Themes are one of the biggest differences between WordPress.com and .org.

Themes on WordPress.COM

Customize on WordPress.comYou are restricted only to the themes that are available on their site. Some of them are free and some of them cost money. If you have the customization upgrade, you will have the ability to change out the colors and fonts in the theme that you choose. If you know enough code, you can even add some CSS to your theme. The interface to change all colors, fonts, and header of your site are pretty easy on .COM and it doesn’t require any knowledge of coding.

Visit WordPress.com Themes to see their selection

Visit WordPress.com Themes to see their selection

Themes on WordPress.ORG

Now, things are .ORG are much more interesting. You are able to put any theme in the entire world onto your site. You can even code your own theme if you feel so inclined.

As is always the problem with choice, it can be very overwhelming. There are hundreds of thousands of themes on the internet for WordPress… so how do you choose?

It’s important to get a theme from a reputable company because many themes out there are full of spyware.

Free .ORG Themes

If you have to have a free themes, you should check out the free themes on WordPress.org. These themes have been vetted by volunteers to ensure that there is vicious code. If you have a little money to spend, I highly recommend that you get a paid theme because they are normally better coded and will make your content really shine.

WordPress.org has a free theme repository full of thousands of themes that are code checked by volunteers

WordPress.org has a free theme repository full of thousands of themes that are code checked by volunteers

Paid .ORG Themes (in no particular order):

It may seem weird to pay for a theme when there are so many free themes available, but you do get what you pay for. Most paid themes have advanced functionality and are updated regularly to meet modern coding standards. The internet is constantly changing and it’s normally just not worth the effort for theme creators to spend time keeping up free themes… but they will keep up themes that they get paid for. Paid themes normally come in two varieties: One time payment or annual renewal fee. More and more designers are leaning toward yearly fees because it makes them more money and therefore they can devote more time to not only keeping their theme updated but to adding additional features to that theme.

ResponsiveResponsive

The number one requirement for all themes is that it is responsive.

Responsive means that the theme changes so it can be viewed optimally on mobile, tablet, and desktop devices. As of the writing of this post, more than 60% of all websites are viewed on a non-desktop device. That means that more people are viewing your site on their phone or tablet than on a desktop. This trend will continue and even more sites will be viewed only on a hand-held device.

Kitchen Sink Themes

Many themes appear to offer everything under the moon. I would recommend that you try to avoid themes that are all things to all people. This extra functionality means that there is more code in the theme and that causes code bloat. Bloating will cause your site to run slower while browsers read through all the extra code… which will cause your visitors to leave. So try to choose a theme that offers just what you need and nothing more so you can have a lean, mean website!

Widgets

WordPress Sidebar WidgetsWidgets are small bits of code that you can insert in your site to add functionality beyond what your theme can do. Most themes offer areas to add widgets, normally in sidebars and footers. Widgets are incredibly useful and there are hundreds out there to choose from (fewer if you are on .COM).  If you’re tech-savvy enough, you can even code in sections for widgets into your WordPress theme.

Popular widgets include tag clouds, archive lists, category lists, email signups, Facebook likes, extra menus, galleries, pulling content from social media outlets like Flickr, Twitter, or Pinterest, top posts/comments, and contact forms. The nice thing is that WordPress will create all the content for you so you can add categories or tags to your posts without having to also go in and add them directly to your widgets.

I encourage you to use widgets, because they keep people on your site. It’s helpful to see how your site is organized and your visitors can see what other great content you have without having to search for it themselves. I would recommend limiting your sidebar and footer to five each and not all the same five. Definitely make use of the Search widget and display it at the top of your sidebar.

I hope that this has been a helpful overview of what is possible with WordPress. Please look out next week for the next part in my WordPress series.

Nikon CoolPix P600 (or P610) Tips for Bird Photography

I’ve been really enjoying my Nikon CoolPix P600 and now that the holidays are fast approaching, I thought that you might find my experience using it helpful when deciding if you want to purchase it. I would recommend this camera to anyone who wants to take bird photos but doesn’t want to spend lots of effort doing so. This camera is for someone who is a birder that takes photos, but not for a photographer who is also a birder.

Overall Thoughts

You will definitely get better photos with a more expensive camera, but if you don’t want to spend the money or just want a better camera than just your regular point and shoot this is the camera for you. It’s also super light compared to a SLR camera, so you can walk long distances with it on without it hurting your shoulder or neck. It can also fit into a large purse or backpack without being too heavy. You also get the added perk of it being smaller than a camera with a detachable zoom.

Lots of people online complain about it taking a while to zoom, which can be true in the right conditions… but I think of it this way: I get more photos with this camera even if I don’t get everything that I possibly could because I wouldn’t lug around a heavy camera as much. I also wouldn’t spend the money for the equivalent type of SLR camera with zoom lense, so this camera is definitely better than no camera at all! This camera is better than a normal point and shoot and works great for those of us who want to take photos of the birds that they see instead of going out just to take photos.

The camera is a little tricky to get used to since it’s not quite a SLR and not quite a point and shoot either. It took me a while using it to figure out the best methods for bird photography, so I hope these tips will help you make the most of your camera!

Bird Mode

Scene Mode on Nikon CoolPix P600
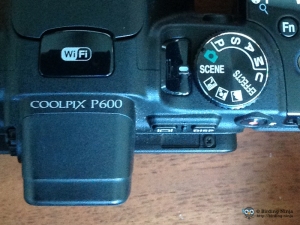
One of the nice features about the P600 is the “Bird Mode.” I’ve shot birds on different settings and shooting birds in Bird Mode is really the most convenient way to focus on moving birds quickly. It appears to focus on whatever the moving object is instead of what foliage that might be in front of the bird.

Getting Into Bird Mode

Bird Mode in Nikon CoolPix P600Finding Bird Mode is not intuitive (the instructions on the Nikon site are useless), so here’s the Cliff Notes version. Rotate the dial on the top of the camera to “Scenes.” Then hit the “Menu” button on the backside of the camera. This will bring up the different scene selection options. If you hit the backside scroll dial down towards the bottom of the list you’ll find “Bird Watching.” Hit “OK.”

You’ll have the option between Single and Continuous. I personally don’t find Continuous all that helpful because it takes the camera SO long to process all the photos that I end up missing sometimes a better shot. Plus, you end up with multiple photos of basically the exact same shot which would only be helpful if a bird was taking off or landing. Since the camera doesn’t do action shots all that well (the wings always end up being blurry), I just normally try to get the bird when it’s still or hummingbirds when they are hovering.

Manual Focus

The most common complaint about the Nikon P600 is that it takes a while to focus (which can be true). If you are staying in one spot waiting for a bird to land, it’s best to put the camera in the manual focus mode. In this mode, the camera stays fixed on one plane of focus, so you can snap away without having to wait on the camera to autofocus. This is how I get most of my backyard hummingbird photos. If you watch the birds for a while, they favor certain spots, so I focus my camera there and wait for them to land there.

coolpix3To get the camera into Manual Focus in Bird Mode, hit the backside scroll dial down. It will bring up a menu on the side. It contains: Auto Focus, Infinity (best for flying raptors or far off birds), and Manual Focus. Continue to hit the dial down and it will highlight the MF mode. Hit “OK.”
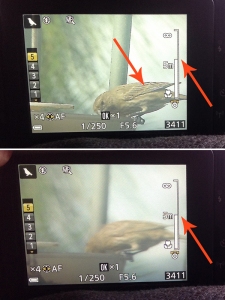
You will see the Manual Focus screen options pop up on the display. The line on the right side shows you the full range of the possible focus. At the top is ‘infinity’ and the bottom is the closest macro shot possible. The smaller the bar, the closer it’s focused and vice versa. To increase/decrease the bar, just scroll the scroll dial right or left.

Notice the white lines on the bird when it's in focus (top photo) versus when it's not (bottom photo)

Notice the white lines on the bird when it’s in focus (top photo) versus when it’s not (bottom photo)

The numbered bar on the left side indicates the amount of lines displayed on the image when it’s in focus. The object in focus will have faint white lines on all its edges to help you know what is exactly in focus on the display. You can also control the amount of lines that appear by increasing the number on the left side (5 is the most lines).To increase or decrease this number, hit the scroll dial up and down. This mode is really helpful because it also zooms in on the bird (in the display only) so you can really see what’s in focus. It takes a little to get used to, but it’s worth it. Especially for when you are in Manual Focus mode.

Using the Zoom

Focus, Zoom, Focus

Like I said multiple times, the most common complaint about this camera is that it can take a while to focus. Since you can’t control the focus at all in AutoFocus mode, you are totally dependent on the camera to do it for you. If it’s evening light or if there is a lot of foliage in the foreground, the camera can take forever to do it.

The best way I’ve found to make the camera focus faster is to focus on the bird zoomed out (by holding the shutter button half way down) then zoom in on the bird while keeping the camera as still as possible. Once you are where you want the bird to be, hold the shutter button halfway down again. This will allow the camera to focus on the bird faster than it would have if you just zoomed in without focusing on the bird first. It seems counter intuitive that it would be faster to focus and then focus again, but it does help when the conditions are messing up the camera’s focus.

Finding a Moving Bird While Zoomed In

The best thing about the P600 is that it has an awesome zoom… but it also makes it difficult to find birds when you accidentally get it out of the frame while zoomed in. I find it’s just easiest to zoom out quickly, find the bird again, focus quickly, and then zoom back in. You can spend forever trying to find it again while zoomed in!

I hope these few tips help you take better photos of your birds! I also would love to hear your experience with this camera, please just comment below.

UPDATE: Since I’ve gotten several requests about it, I’ve added links to all the supplies that I use to create my photos and art on my supplies page.

WordPress for Birding Blogs, Part 5: Auto-push Content to Social Media

This is the part of a multi-part series about using WordPress for birding blogs. Click here to start at the beginning.

Using Social Media to Drive People to Your Site

Back in the beginning of blogs, people used to use RSS feeds which allowed you to subscribe multiple blogs and have all the posts appear in whatever reader you want to use. This way you didn’t have to go to each individual site to read all the content.

Unfortunately, RSS readers have decreased in popularity in the last few years and lots of people don’t use it anymore. What people do use is social media… Facebook, Twitter, Tumblr, Pinterest, etc. So you if you want people to read your content, you have to spread it onto as many social media platforms as possible. This is can be a HUGE pain because you have to create an account on each platform and then post on it each time you publish a new post on your blog.

Push Posts to Social MediaBut with WordPress.com or Jetpack, there is an easier way! On WordPress.com, go to Settings > Share to open up Publicize. From here you can link all your different social media accounts in your WordPress blog. You can even hook up different people’s accounts so it will push to certain ones and not others.


Publicize

Now whenever you post, the word Publicize will appear in the Publish box. If you click on “Edit” next to it, it will show all the different social media outlets you have synced. You can deselect ones if you don’t want it to publish it to whatever reason. You can also customize the message that shows up.

Once you hit Publish, it will also create a new post on each of the social media applications you have checked. If you schedule a post for the future, it will publish it whenever you have scheduled your post. Below you can see the same post published to three different social media applications.

Unfortunately, Publicize doesn’t currently post to Pinterest so you will have to post directly to that yourself.

Sharing Your Content

Sharing ButtonsAnother way you can drive people to your site via social media is to let people post your content on their social media accounts! The best way to get people to post your content to, say Facebook, is to put a button at the end of the article. That way all they have to do is to push a button and it appears on their Facebook page.

Sharing ButtonsIn the Settings > Sharing, you will see Sharing Buttons. All you have to do is drag which ones you want and they will appear at the bottom of the post, like the image to the right. You can even set it up to show how many times each it’s been shared.

Comments

CommentsEach post and page in WordPress allows people to leave their comments on it. You can turn that off, of course, but it’s a good idea to keep it on so you can interact with your visitors. That way they can ask questions or leave comments and you can respond to.

You will get some spam comments and you’ll need to make sure that you don’t approve them or else you might get blacklisted by Google if they also blacklist the spammer. Usually, it’s pretty obvious because they aren’t customized to your content.

I hope these tips helped you out. Stay tuned for Part 6.

WordPress for Birding Blogs, Part 4: Adding Galleries, Video, and Audio

This is the part of a multi-part series about using WordPress for birding blogs. Click here to start at the beginning.

Let’s Add All the Pictures!

Only the best meme ever.

Only the best meme ever.

Now, a site about birds without any photos, videos, or song files is boring. So boring in fact that articles with images get 94% more views than articles without (source). That crazy talk.

Adding Fancy Galleries

Every blogging platform out there let’s you post images, so I’m not going to go into that here. Check out this article about how to post pictures in WordPress. But I am going to go over the cool ways that WordPress let’s you create fancy galleries. If you don’t use .COM, download Jetpack and activate Tiles Galleries.

Tiled Gallery OptionsTiles Galleries allows you to add multiple images to a gallery and then change how those images are displayed. You have several options. I’m going to take the same three images and show you below how they display.

In the gallery settings, you can select which type of gallery display you want. Let’s go over how they look now.

Thumbnail Grid

Tiled Mosaic

Fixed Ratio in PhotoshopThis is my personal favorite. If you don’t like how the images are sorted, just rearrange them and they will tile differently. When cropping images for this type of gallery, I find it’s helpful to keep them at simple ratios. In Photoshop, I used the Fixed Ratio setting in the marquee tool and only use whole numbers when cropping. That allows the images to fit together really well. It’s not 100% necessary, but I find it makes the galleries look better.

Square Tiles

Circles

EDIT: I’ve had some people say that they can’t see the circles and they just appear as squares. This is probably because you are using an older/phone browser that doesn’t support CSS3. This effect is created by using border-radius and when it appears in a browser that doesn’t support the code, it will appear as squares. It’s just an extra fancy effect that people who keep their browsers updated get to experience.

Slideshow

Studies have shown that people don’t really watch slideshows or carousels on the internet. I don’t recommend that you use them either. Use one of the other options instead.

This slideshow requires JavaScript.

Photon

Oh, and if you have Jetpack, make sure to turn on Photon. I won’t explain how it works, but it makes your images download significantly faster for your visitors. If you have .COM, don’t worry about it, it’s already integrated into your site.

 Video

Adding video is even easier than adding images. There are two main ways to add video to your site and I have definite opinions on this:

  1. Upload the video directly to WordPress using the “Add Media” button.
  2. Use a video service like Vimeo or YouTube to host the video and then put the link on your site via a shortcode.

I’ll be blunt: Number 1 is a terrible idea and Number 2 is definitely the way to go. There are lots of technical reasons, but the simple explanation is that with the all the different web browsers (Chrome, Firefox, etc), all the devices (tablets, phones, laptops), and all the different companies (Apple, Microsoft, etc) it makes it almost impossible to figure out what is the best way to display the video so everyone can see it. Since it’s so difficult to keep on top of the changing landscape of video, it just easier to let a company that deals with it all day host your videos for you. Hosting companies don’t have time to keep on top of it and the volunteers building WordPress don’t have it either. Plus, you have the added benefit of someone finding your site through a video you post on YouTube or Vimeo.

Bottom line: If someone wants to host your horribly large files, optimize your video for the web, and pay expensive programmers to constantly keep your video up to ever-changing web coding standards… LET THEM!

Shortcodes!

WordPress.COM and Jetpack (as of 4.0) supports shortcodes for the following video providers:

  • YouTube
  • Vimeo
  • Hulu
  • Flickr (video)
  • Animoto
  • DailyMotion
  • Viddler
  • Blip.tv
  • TED Talks
  • Educreations
  • Instagram
  • AolOn
  • Vine
  • Videolog

Let’s see an example of how to use shortcodes to embed video, using my favorite video host, Vimeo. Here is the link to my vimeo video: http://vimeo.com/106415606

Now, if you don’t care what size the video is, all you have to do is take that URL and paste it into your post. It should fill up the entire width of your post. Like so:

Now, if you want to have control over the size, you have to make it into a shortcode. Just add the number at the end of the URL into this code: [vimeo 106415606 w=500&h=280]

Just replace 500 with whatever width you want and the 280 with the height. Shows up like this:

Audio

The audio works the same as the video. You could post it directly into WordPress but then you would need to worry with this chart. That’s lots of effort. OR you can post it in a third party application and then paste the shortcode into your posts. WordPress currently supports:

  • SoundCloud
  • Rdio
  • Spotify
  • Bandcamp
  • 8tracks

It works the same as the video shortcodes, so I won’t go into each tutorial. If you want a step-by-step instructions, click out this link.

Other Third Party Shortcodes

Just FYI, here are the other third party applications that have shortcodes in WordPress:

  • Instagram
  • Scribd
  • Slideshare.net
  • Google Docs
  • Microsoft Office Live
  • Google Maps
  • Twitter
  • Wufoo
  • iCalendars

That’s a quick overview of how easy it is to add images, video, and audio clips to your blog! If you have any questions, please post them in the comments below. Stay tuned for the next part in the series.


Attract Birds with a DIY Fountain

GoldfinchApparently, my bird seed experiment went so well that now there is a constant stream of finches lined up at my feeders and I’m going through suet like crazy. The suet cylinders are especially popular so I’m going through one every 5-7 days. Since the birds are going through them so quickly, it’s starting to get hard keeping them in stock and not running to WBU every month.

So, I started searching around the internet and multiple people mention water attracting birds. I don’t know why I didn’t think of it before, you get a larger variety of birds because all of them drink water but not all eat suet. Also, water is fairly cheap and in easy supply so it would mean a larger variety of birds and fewer trips to the store. So I started looking around.

The Search

The first major requirement was a shallow area where the birds could perch. I wouldn’t want to hang over the deep end of a swimming pool to drink water so I understand why birds don’t want to drink out of deep fountains. They need some place to land so they feel comfortable that they aren’t going to fall into the water.

Bird Baths

So, this naturally lead me directly to bird baths. The problem with these is that you have to fill bird baths all the time and unless you get a water wiggler you get mosquito eggs. I know from previous experience that it’s just too dry in San Diego to be able to keep birth baths full and mosquito-free so I nixed this idea from the start.

Commercial Fountains

Standard Fountains

Traditional Fountain on Houzz.com

Then I moved to the idea of commercially available fountains. The first problem I encountered is that most fountains like this are basically large deep bowls stacked on top of each other with cascading water. The water stream from one bowl to the next is pretty fast and thick, not the right conditions for birds to fly through to bathe. Also, the bowls are so deep that they might not feel comfortable drinking from them. My mom has a traditional wall fountain with two half bowls of water and never gets birds.

Urn Fountains

Mediterranean Landscape by Santa Barbara Landscape Contractors Pacific Green Construction Landscape on Houzz.com

But, there are other fountains. The most colorful being the urn/pot fountains. This type of fountain has a underground reservoir that holds the majority of the water and recirculates it to the top using a pump. The reservoir is covered with rocks so it appears that the water flowing down the sides of the pot disappear into the ground. The effect is quite wonderful, but it causes a few issues:

  1. I live in an area where is the ground is full of rocks and is pretty hard. It would be difficult to dig down the 5 feet required to install one of these reservoirs.
  2. I have a curious and rambunctious little dog that would probably spend his days playing in and drinking from the gross bird water. I don’t want him dragging in mud into the house and I don’t want him to be able to drink from the fountain. That means the fountain bowls need to be high enough that he can’t reach them. This also has the added benefit of him not being able to harass the birds.

So, any sort of urn fountains are out, which is sad because this is my favorite type of fountain.

Bird Specific Fountains

Traditional Outdoor Fountains by Camas Furniture & Accessories Soothing Company on Houzz.com

This means that I need to find a fountain that doesn’t have a bowl within reach of my pooch and doesn’t have deep bowls so the birds will actually sit in it. This eliminates the majority of commercially available fountains I could find. However, there are several companies that make specific bird fountains. They are similar to millstone fountains where the water flows over a flat surface into a bowl underneath. They don’t hold much water, but they are made specifically for birds.

Maybe I’m just getting picky at this point, but why do all of them have to have ceramic birds on them? I don’t want my actual birds fighting for space around fake birds. Also, the colors that these come in are kinda a snooze-fest. I just couldn’t get excited by any of these. They also seem really hard to clean.

What’s a girl to do?

So, I kept an eye out for other fountains that I thought fit the bill better. I just knew that there had to be a better solution out there but I just couldn’t find it. I kept getting disappointed over and over looking at commercially available fountains that I started looking into ones that I could make myself.

The DIY Option

The final product.

The final product.

Most DIY solutions I could find were a variation on the urn/pot method where you take a pot and create a reservoir, which I already knew didn’t work for me. All the options seemed to involve lots of work until I started stumbling across the bamboo spout for pot fountains. You basically take any pot and add this bamboo spout connected to a pump and you have a fountain. Genius.

I found the bamboo fountain spout available at my local nursery and also on Amazon. The height of the spout relates to the diameter of the pot you use. It has a small pump that you place at the bottom of your pot that attaches to a tube that runs down the middle of the bamboo. Just put water in the pot, plug it in, and you’re good to go. Ta Da! Instant fountain.

Since birds don’t like deep water, I added some rocks from my yard to place in the bottom to give the birds something to rest on while taking a bath and drinking. I found that you need to really get flat rocks and place them at a slight angle so no matter how low the water level gets, the birds can walk down to the edge easily.

The Verdict

Initially, the introduction of the fountain freaked out all of the birds in the yard except the hummingbirds and my overall bird count dropped significantly. After a few days, however, the birdies were back at the feeder giving the fountain the stink-eye the whole time. It’s taken the neighborhood birds a week or so, but they are finally starting to use the fountain!

I’ve seen a HUGE spike in the diversity of the birds in my yard. They seem to be attracted to the water. Some just sit on the edges of the yard taking in the scenery, some dive right in. I’m hoping that over time the more hesitant birds will become braver. We’ll see.

WordPress for Birding Blogs, Part 3: Organizing Content

This is the part of a multi-part series about using WordPress for birding blogs. Click here to start at the beginning.

Posts

Scheduling Future Posts

Publishing Posts in the FutureSo, what’s so great about WordPress? It allows for really great flexibility in generating your content. For example, I have a month’s worth of posts all set up and ready to go for this site. That way if I’m sick or traveling, the blog is still spitting out content for me.

It’s super easy to schedule posts in WP. All you have to do is locate this Publish box located in the upper right-hand corner of your individual posts screen. See where it says “Publish immediately”? Click “Edit”.

Publish posts in the future

Set the future date, and click “OK”, and then the blue “Schedule” button in the Publish Box.

Now all you have to do change the date to whatever future date you want it published. This is example I scheduled it for the year 2030. Obviously, that’s silly, but you see my point. Once that date and time roll around, it will publish the post for you.

Schedule Posts for the Past

Now, what if you want it to publish a post but you’re referencing a birding trip that was two years ago? Or what if you want it to look like you’ve been posting for a really long time when in reality you haven’t (companies do this a lot)? Or you wrote an article or paper back in the day and now you want to post it to the internet?

Publish posts in the past

Set the date of your post to a past date. I picked 1995. Remember Hamster Dance and animated gifs? Your post can be that old.

You can use the same process for the future posts as past posts. You place the date that you want your post to have been published, click “OK” and then “Publish”. Done. Your post will sort on your site just like it was posted in 1995 and also display the old date.

Categories and Tags

WordPress Categories

I only selected one category for this post.

Organizing content is confusing (just ask any librarian). Imagine that you had a blog with a hundred posts on it. How does a visitor find the most relevant content on your site? They sure don’t want to scroll through 100 posts just to find something that’s interesting to them. Categories and Tags allow you to sort your content by keywords and group similar posts together for easy navigation. Tags and Categories are similar and basically act the same but with small differences.

How to use tags and categories

WordPress Tags

Here are all the tags that I used for this post.

Categories are considered top level content and Tags are one-of or specific details. For a post about your recent birding trip to Hawaii, you might have categories like “Birding Trips” and “Bird Photography” and tags like “Red-crested cardinal,” “Hawaii,” or “Tropical Birds”. You can add categories to your menu so you could have all posts labeled with “Birding Trips” show up once you clicked “Birding Trips” from the menu. Plus, categories and tags show up for each of your posts. If a visitor clicks on one of them, they are automatically shown all posts with that category or tag applied. It helps visitors find similar content.

Tags and Categories Widgets

WordPress Tag CloudSome other fun things you can do with tags and categories is add them as widgets to your site. Widgets allow you to add content in the sidebar or footer (depending on your theme). For example, here is the Tag Cloud widget for my site. The more you use a tag, the larger it appears in the widget.

Related Posts

Related PostsTags and categories are also used by the “Related Posts” feature (already integrated in .COM, available for .ORG in Jetpack) to calculate which posts to display at the bottom of your post. This makes it easy for your visitors to find additional content on your site without having to find it themselves. This feature is really popular for news sites.

Stay tuned for Part 4: using WordPress to automatically push content to social media…

WordPress for Birding Blogs, Part 2: What is WordPress?

This is the part of a multi-part series about using WordPress for birding blogs. Click here to start at the beginning.

What is WordPress?

WordPress is a blogging platform, similar to products like Blogger, but it contains features that allow it to expand to larger sites. You can have multiple authors, themes, plugins, and publishing options that aren’t available in other platforms. Major sites like The New York Times, CNN, Forbes, TechCrunch, and Time Magazine use WordPress but it’s also flexible enough to be used for a simple birding blog.

WordPress is an open source project maintained by hundreds of volunteers and is completely free to anyone who wants to use it. You can download the software and upload it to any website or computer you want. Once you upload it and sync it to a MySQL database, you can start publishing posts to it anywhere in a the world immediately.

WordPress.com vs WordPress.org

Before we move forward, I want to clear up common confusion for those new to the WordPress community: the difference between WordPress.COM and WordPress.ORG. WordPress.ORG is the free open-sourced version that you download and put onto whatever web hosting you want to use.

WordPress.ORG is completely free but you are responsible for finding and paying for your own web hosting. You’re also responsible for your own maintenance, but you also have total freedom on how you use your WordPress install. You can add any theme or plugin you want.

automattic-cmykWordPress.COM is a commercial company run by Automattic that will host your WordPress install for you. You don’t have the ability to add plugins or themes, but also you don’t have to worry about security or web hosting. If you aren’t tech-savvy, WordPress.COM offers technical support and works as a cheap alternative to hiring a web designer or web company. WordPress.COM has different paid levels and also allows you to place ads on your blog if you are looking to make some money off your posts.

WordPress.org

  • Host yourself
  • Download and use any theme you want
  • Download and use any plugin you want
  • Publish to social media via plugins like Jetpack
  • Ability to integrate Google Analytics
  • Support forum run by volunteers

WordPress.com

  • Host it for you
  • Hundreds of free and paid customizable themes and custom designs upgrade
  • Several plugins already installed
  • Integrate and auto-publish to social media
  • Web traffic stats available
  • Support forums and direct contact with technical support

Which is better? Well, like all things in life the answer is: it depends.

For this site, I use WordPress.COM. Mostly, it’s because the needs I have for this site are pretty small. I don’t want to spend time thinking about updating databases, worrying about security, and all the general maintenance that comes with a self hosted site. I don’t need any specific plugins or themes to make my site run, so WordPress.COM is honestly just easier for this project than a WordPress.ORG self-hosted site. I want to spend my time working on generating content, not tweaking code.

If you like having complete control over your site or want to spend your time making everything just like you imagine in your head (or paying someone to do it) then WordPress.ORG is the way to go. If you have an eCommerce portion to your site or want to do memberships, then probably WordPress.ORG is for you. Like I said, it all depends.

Bottom line: If you are like me and just want a way to easily post photos of birds online and not deal with the rest, then WordPress.COM is a great and cheap solution.

JetpackGoing forward, I’m going to use WordPress.COM as my examples. I’ll mention when things are fundamentally different for WordPress.ORG but mostly it will be surface things like the location of buttons or menu items. To make your WordPress.ORG site almost exactly like a WordPress.COM site, just download a plugin from Automattic called Jetpack. It will give you access to the same features available on .COM but with the flexibility of .ORG.

Quick Note: WordPress.com is currently working on creating a more user friendly interface than the standard WordPress one. In this series I’m going to only address the standard interface (current as of WordPress 4.0) because 1. it applies to both .com and .org and 2. since they are still working on building the new UI I don’t want to create a post about it to only have it outdated in two months.

Stay tuned for Part 3 going over images, audio, and video…

WordPress for Birding Blogs, Part 1: Introduction

As you might have noticed, I changed the design of my site recently. I had a couple of people asking me about it. Mostly, they wanted to know how much work it was to create the new site and how much did it cost. Well… I have a little secret:

It hardly took any time at all.

wordpress-logo-simplified-rgbNow, I’m sure you’re thinking, “But J.J., you’re a web designer, of course it took no time at all because you actually know what you are doing!” Well, that might be partly true, but really the reason that my switch was so easy is that I’m using WordPress. With WordPress, all my content is already there, all I had to do was switch the “theme” which changed the whole look and feel of my site. In just a couple of clicks, your whole site can look completely different but all your content still be the same.

Now, you might have heard of WordPress but never really used it. I know lots of people use sites like Blogger, Tumblr, or (haha) Google+, but hands down, WordPress is the best and most flexible blogging platform out there. I use WordPress exclusively for my clients, that’s how much I believe in it as a product.

Switching to a more complex platform like WordPress can be daunting, so I want to do a multi-part series of how to use it and show you how to tap into its potential. If you ever have any questions, please feel comment below.

WordPress Multi-part Series

What is WordPress? Explaining WordPress.com vs WordPress.org.

Organizing Content: How to use WP features to schedule posts in the past, present, and future. How to use Categories and Tags to help visitors navigate your site.

All the Birdies: How to create cool galleries, display videos, and audio on your site.

I’m Going to Be Famous: How to use WordPress to push your content automatically to different social media outlets and how to manage the comments on your site.

Makin’ It Pretty: How to use WordPress themes to completely change the look of your site in just a few clicks. How to use Widgets to add auto-generated content to your site.

Too Many Cooks in the Kitchen: How to add multiple content contributors to your blog and set their access level so they don’t go changing everything on your site.